
How to Upgrade .NET MAUI & Blazor Hybrid Apps to .NET 9 in Minutes
Introduction
As a developer, I recently undertook the task of upgrading my productivity tool, CodeSwissKnife, from .NET MAUI 8 to .NET 9. Through this experience, I discovered valuable insights that I’m excited to share with you. In this article, I’ll guide you step-by-step through the upgrade process, ensuring it feels straightforward and manageable.
CodeSwissKnife is specifically designed for developers who seek enhanced productivity while maintaining the security of their data. Available for both Windows and macOS, this offline-first application consolidates essential developer tools in one convenient package, free from the vulnerabilities of online services. By upgrading to .NET 9, CodeSwissKnife has benefited from improved performance, new features, and enhanced cross-platform capabilities.
Whether you’re upgrading your own projects or diving into .NET MAUI for the first time, this guide will help you make the transition smoothly and successfully.
What’s New in .NET 9 for .NET MAUI and Blazor Hybrid?
NET MAUI 9: Focus on Quality and Platform Support, the primary focus of .NET MAUI 9 is on enhancing product quality through expanded test coverage, end-to-end scenario testing, and comprehensive bug fixing. This release brings significant improvements in stability and reliability, making it a worthwhile upgrade for existing applications.
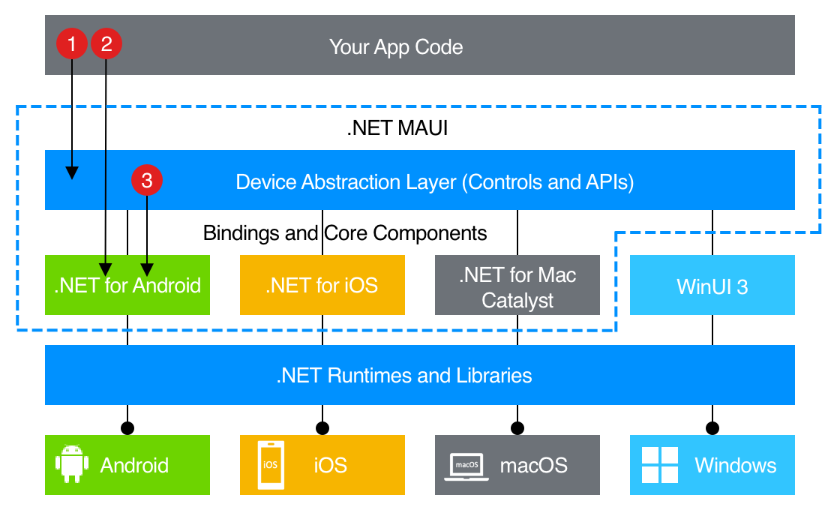
Platform Requirements and Compatibility:
- Requires Xcode 16 for iOS 18, iPadOS 18, tvOS 18, and macOS 15 support
- Minimum deployment targets:
- iOS 12.2
- Mac Catalyst 15.0 (macOS 12.0)
- Android and Windows targets remain unchanged
New Controls and Features:
- HybridWebView (New Control):
- Enables hosting HTML/JS/CSS content in a native web view
- Supports bi-directional communication between JavaScript and C#/.NET
- Perfect for integrating existing web applications into native MAUI apps
- Runs locally on device with full app store compatibility
- Windows Titlebar (New Control):
- Customizable title bar for Windows applications
- Supports custom content, leading/trailing elements
- Improved Performance:
- Faster Startup Times: Applications now start more quickly, enhancing the overall user experience.
- Reduced App Size: The introduction of full trimming helps to create smaller app packages, improving distribution times and performance.
- Multi-Window Support:
- Enhanced support allows multiple windows to be activated simultaneously, providing a better multitasking experience on platforms like Mac Catalyst and Windows.
- Native AOT (Ahead-of-Time) Compilation:
- Now available for iOS and Mac Catalyst, Native AOT compiles apps directly to native code, significantly improving startup times and reducing app size.
- Handler Improvements:
- The
DisconnectHandlermethod is automatically called when navigating backward, simplifying memory management and preventing potential memory leaks.
- The
- Updated XAML Compiler:
- New error codes and optimizations for the XAML compiler streamline the development process and improve error resolution.
- Blazor Hybrid Enhancements:
- Changes to the BlazorWebView now use a different internal hosting address to improve compatibility and functionality. Additionally, there are new settings for async disposal to enhance performance and reduce deadlocks.
- Framework and API Updates:
- New APIs and controls have been introduced, offering developers more tools and functionalities for building rich applications.
- Deprecated APIs from previous versions have been highlighted for developers to transition away from.
- Security and Stability Improvements:
- Updates also include improvements focused on app stability and security, ensuring a safer development environment.
Real-World Example: CodeSwissKnife Upgrade Journey
As the developer of CodeSwissKnife, a comprehensive utility tool designed for developers, I was eager to explore the benefits of .NET 9. Since CodeSwissKnife was built with .NET MAUI 8 and follows best practices for cross-platform development, I anticipated a smooth transition – and that’s exactly what happened.
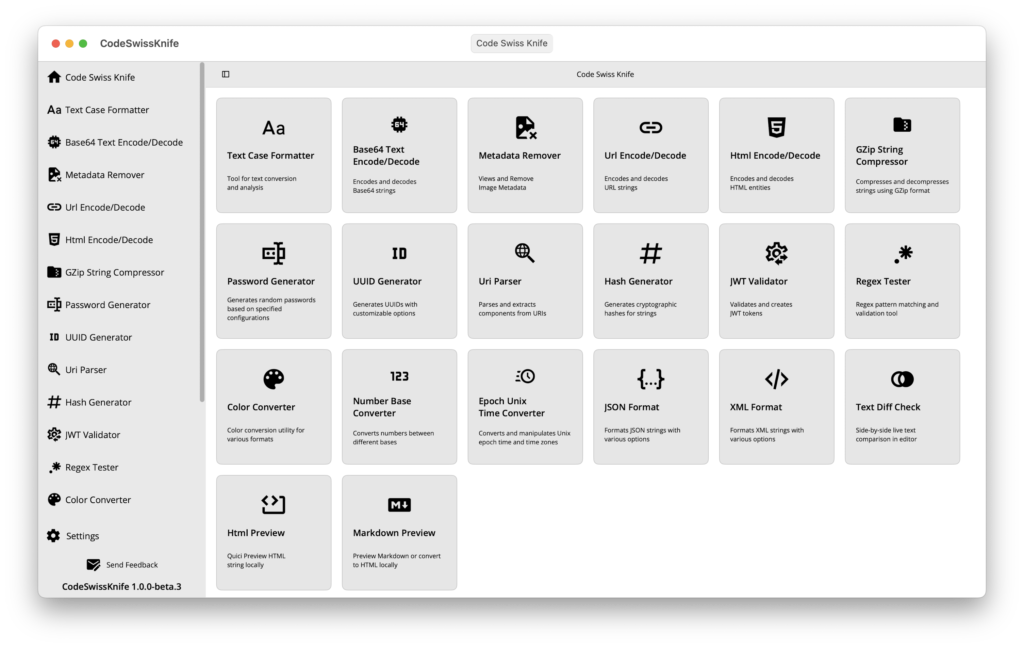
CodeSwissKnife is an offline-first application that provides secure developer tools without relying on online services. It includes features like:
- Secure password generation and management
- Code formatting and validation
- Development utilities and converters
- Cross-platform compatibility for both Windows and macOS
My Upgrade Experience: The upgrade process was remarkably straightforward, primarily because:
- Cross-platform considerations were already properly handled
- The application was well-structured from the beginning
- .NET MAUI 9 maintains strong compatibility with .NET MAUI 8
- The offline-first architecture minimized potential breaking changes
To ensure that your upgrade process includes all the necessary updates introduced in .NET 9 MAUI templates, I highly recommend creating a new .NET 9 MAUI project. By using it as a reference template, you can compare it with your existing project and verify that your changes align correctly with the recommended structure and settings. This approach helps ensure that you don’t miss any important updates or configurations specific to .NET 9.
Prerequisites To upgrade from .NET 8 to 9:
- First, read the release notes and What’s New in .NET 9
- Install .NET 9 and the .NET MAUI workload with the standalone installer and
dotnet workload install mauicommand. - Supported platforms for .NET MAUI apps.
- Visual Studio Code (VSCode): Install Visual Studio Code for a lightweight code editor.
- C# Extension for VSCode: Install the C# extension for VSCode to enable C# support.
- .NET MAUI extension for VS Code: Install the MAUI extension for VSCode.
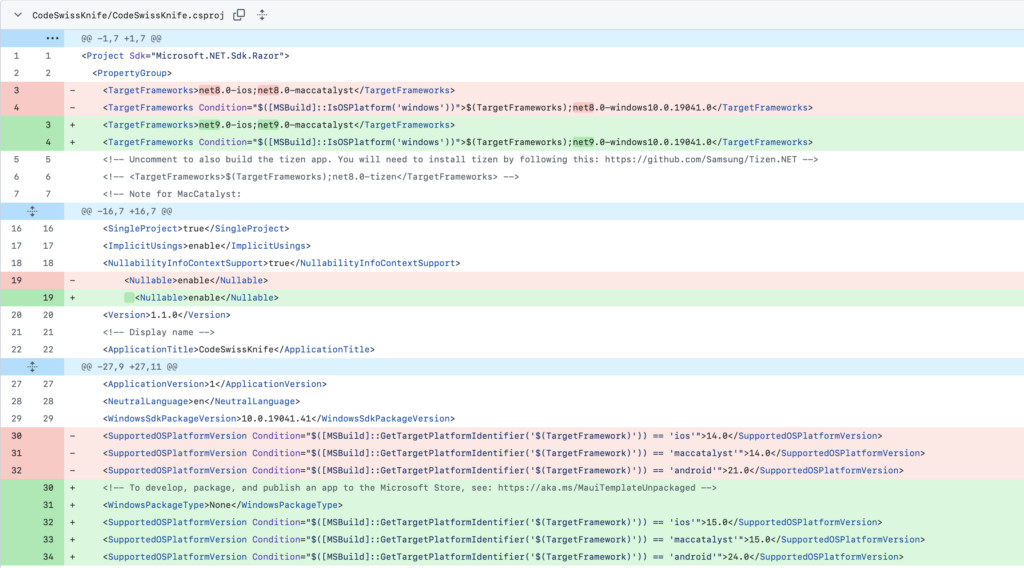
Step 1: Update Target Framework
<TargetFrameworks>net9.0-ios;net9.0-maccatalyst</TargetFrameworks>
<TargetFrameworks Condition="$([MSBuild]::IsOSPlatform('windows'))">$(TargetFrameworks);net9.0-windows10.0.19041.0</TargetFrameworks>
Step 2: Update Supported OS Platform Version
<SupportedOSPlatformVersion Condition="$([MSBuild]::GetTargetPlatformIdentifier('$(TargetFramework)')) == 'ios'">15.0</SupportedOSPlatformVersion>
<SupportedOSPlatformVersion Condition="$([MSBuild]::GetTargetPlatformIdentifier('$(TargetFramework)')) == 'maccatalyst'">15.0</SupportedOSPlatformVersion>
<SupportedOSPlatformVersion Condition="$([MSBuild]::GetTargetPlatformIdentifier('$(TargetFramework)')) == 'android'">24.0</SupportedOSPlatformVersion>
Step 3: Upgrade Nuget Packages
I recommend also adding explicit package references to .NET MAUI NuGet packages.
Variable-based version (Using $(MauiVersion)):
<MauiVersion>9.0.21</MauiVersion>
<PackageReference Include="Microsoft.Maui.Controls" Version="$(MauiVersion)" />
Explicit version (Using specific number):
<PackageReference Include="Microsoft.Maui.Controls" Version="9.0.21" />Remove packages no longer included in .net 9, Microsoft.Maui.Controls.Compatibility namespace have been obsoleted.
<PackageReference Update="Microsoft.Maui.Controls.Compatibility" Version="9.0.12" />Step 4: Update Windows Package
Add the new default WindowsPackageType in the project file and update the launchSettings.json, you can find more info here.
<WindowsPackageType>None</WindowsPackageType>{
"profiles": {
"Windows Machine": {
"commandName": "Project",
"nativeDebugging": false
}
}
}Step 5: Remove Deprecated APIs
Frame is Being Replaced by Border
Old Way (Deprecated):
<Frame BorderColor="DarkGray"
       CornerRadius="5"
       Margin="20">
    <!-- content -->
</Frame>
New Way (Recommended):
<Border Stroke="DarkGray"
        StrokeShape="RoundRectangle 5"
        Margin="20"
        Padding="20">
    <!-- content -->
</Border>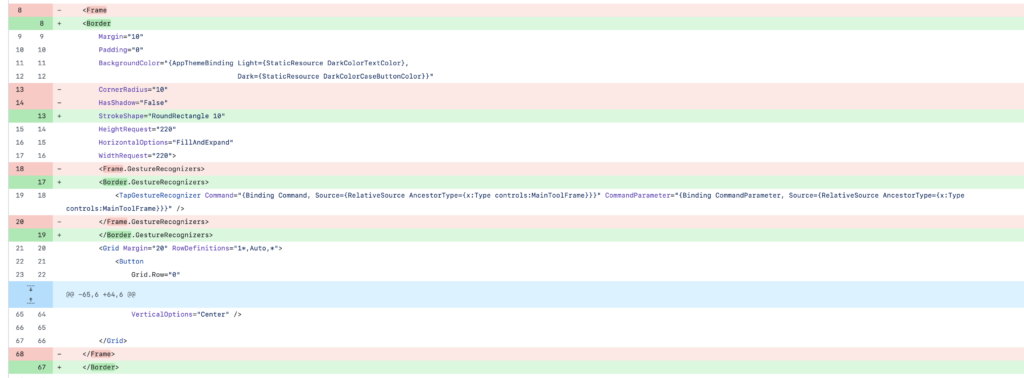
MainPage is Being Replaced by Window.Page
Old Way (Deprecated):
public App()
{
    InitializeComponent();
    MainPage = new AppShell();
}
New Way (Recommended):
public App()
{
    InitializeComponent();
}

protected override Window CreateWindow(IActivationState? activationState)
{
    return new Window(new AppShell());
}
Step 6: Update App.Current.MainPage
As we saw above MainPage has been deprecated:
Old Code for Main Page
await App.Current.MainPage.DisplayAlert("title", "message", "ok", "cancel")Updated Code for Main Page
await AppShell.Current.DisplayAlert("title", "message", "ok", "cancel")Step 7: Update Styles.xaml
Remove the style for the Frame and add one for the new TitleBar component:
<Style TargetType="TitleBar">
    <Setter Property="MinimumHeightRequest" Value="32"/>
    <Setter Property="VisualStateManager.VisualStateGroups">
        <VisualStateGroupList>
            <VisualStateGroup x:Name="TitleActiveStates">
                <VisualState x:Name="TitleBarTitleActive">
                    <VisualState.Setters>
                        <Setter Property="BackgroundColor" Value="Transparent" />
                        <Setter Property="ForegroundColor" Value="{AppThemeBinding Light={StaticResource Black}, Dark={StaticResource White}}" />
                    </VisualState.Setters>
                </VisualState>
                <VisualState x:Name="TitleBarTitleInactive">
                    <VisualState.Setters>
                        <Setter Property="BackgroundColor" Value="{AppThemeBinding Light={StaticResource White}, Dark={StaticResource Black}}" />
                        <Setter Property="ForegroundColor" Value="{AppThemeBinding Light={StaticResource Gray400}, Dark={StaticResource Gray500}}" />
                    </VisualState.Setters>
                </VisualState>
            </VisualStateGroup>
        </VisualStateGroupList>
    </Setter>
</Style>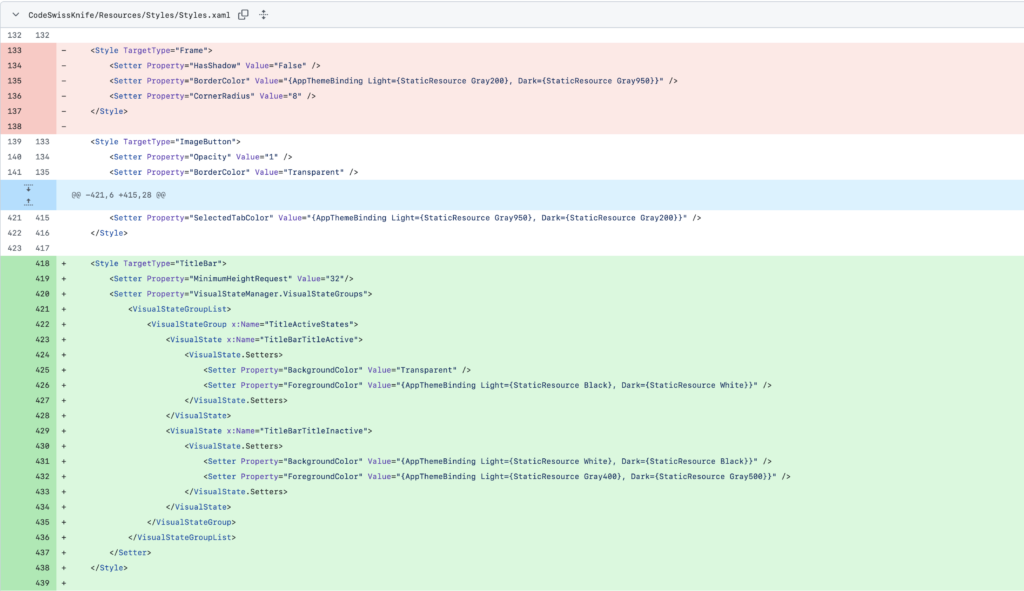
Step 8: Delete your bin and obj folders
To ensure a clean build after upgrading your project to .NET 9, it’s important to delete the bin and obj folders. These folders contain temporary files generated during the build process, which may become outdated or incompatible after an upgrade
Step 9: Run your .NET 9 Maui App
After successfully upgrading your project to .NET 9, it’s time to run your application and see the improvements in action.
How to Run Your App:
- Open Visual Studio and load your upgraded project.
- Select the target platform (such as Windows, macOS, Android, or iOS) from the toolbar.
- Click the Run button (or press F5 on your keyboard).
What to Expect:
- Your application will launch with the updated .NET 9 features.
- Look for improved performance, faster startup times, and any new enhancements you’ve integrated.
- Test its functionality to ensure everything works smoothly after the upgrade.
By running your app, you’ll validate that the upgrade was successful and experience firsthand the benefits of .NET 9!
Conclusion
Upgrading to .NET 9 from .NET 8 has proven to be a straightforward and rewarding process. In just a few minutes, I was able to successfully migrate my own app, CodeSwissKnife, a secure, offline-first developer productivity tool, thanks to the seamless enhancements in .NET MAUI.
The new features and improvements in performance, stability, and compatibility were immediately noticeable, making the upgrade not only worthwhile but also an exciting step forward for my application. With just a few steps, such as updating NuGet packages, modifying project settings, and ensuring compatibility, the transition required minimal effort and delivered maximum benefit.
This shows how .NET MAUI continues to empower developers to build modern cross-platform apps with increased productivity and ease. Whether you’re working on a personal project or managing a production application like CodeSwissKnife, upgrading to .NET 9 is an excellent way to take advantage of the latest improvements.
If you think your friends or network would find this article useful, please consider sharing it with them. Your support is greatly appreciated.
Thanks for reading!
 Discover CodeSwissKnife, your all-in-one, offline toolkit for developers!
Click to explore CodeSwissKnife
