Advanced JWT Authentication in ASP.NET Core Minimal API. Part 1: Token Validation and Manual Generation
Introduction
In a previous article, I wrote about How to Implement JWT Authentication in ASP.NET Core Minimal API, where I introduced the basic concept of JWT (JSON Web Tokens) and demonstrated how to implement authentication using the dotnet user-jwts tool. This approach provided a straightforward way to secure APIs during development by automatically handling token generation and validation.
However, while dotnet user-jwts is excellent for development and testing, production environments require more control over token generation and validation. In real-world applications, you need to manage user credentials, implement custom validation rules, and have full control over the token generation process. This is where manual token generation and custom validation parameters become essential.
In this article, I’ll build upon the previous JWT implementation and show you how to manually generate JWT tokens and configure custom validation parameters in an ASP.NET Core Minimal API. By the end, you’ll have a production-ready example that gives you complete control over the authentication process, from token generation to validation, enabling you to implement sophisticated security requirements and handle authentication scenarios beyond basic development needs.
Let’s dive into the details of token validation parameters and explore how to generate JWT tokens programmatically while maintaining security best practices.
Understanding JWT Token Generation Approaches
When implementing JWT authentication, there are three main approaches to generate and manage tokens. Let’s understand each one and why we’re choosing a specific approach for our implementation.
1. Self-Managed Token Generation (In-App)
This is what we’ll implement in our example. Think of it as a “do-it-yourself” approach where our application handles everything:
// Example of self-managed token generation
public string GenerateAccessToken(string username)
{
    var claims = new[]
    {
        new Claim(ClaimTypes.Name, username),
        new Claim(JwtRegisteredClaimNames.Jti, Guid.NewGuid().ToString())
    };
    // ... token generation code
}
Why we’re using this approach:
- Perfect for learning how JWT works
- Complete control over the implementation
- No external dependencies
- Ideal for small to medium applications
Important Note: While we’re using this approach for learning, in production environments, especially for larger applications, you might want to consider the other options below.
2. Third-Party Identity Providers
Imagine these as “authentication as a service” platforms. They’re like security experts you hire to handle your authentication:
// Example of Auth0 integration
services.AddAuthentication(JwtBearerDefaults.AuthenticationScheme)
    .AddJwtBearer(options =>
    {
        options.Authority = "https://your-auth0-domain.auth0.com/";
        options.Audience = "your-api-identifier";
    });
Popular Providers:
- Auth0: Like having a complete security team in the cloud
- Microsoft Entra ID, formerly known as Azure Active Directory (Azure AD): Microsoft’s enterprise solution, perfect for Office 365 integration
- Okta: Enterprise-focused identity management
- Firebase Auth: Google’s solution, great for mobile apps
Real-World Analogy:
Think of it like home security. Self-managed is like installing your own security system, while using a third-party provider is like hiring a security company that provides everything: equipment, monitoring, and maintenance.
3. OAuth 2.0 Authorization Server
This is like having your own security department, but following industry-standard protocols:
// Example of IdentityServer4 integration
services.AddAuthentication("Bearer")
    .AddJwtBearer("Bearer", options =>
    {
        options.Authority = "https://localhost:5001";
        options.Audience = "api1";
    });
Popular Implementations:
- IdentityServer: Ex Open-source .NET solution
- Keycloak: Enterprise-grade, open-source solution
- OpenIddict: Lightweight, modern solution
Real-World Analogy:
It’s like having your own security department that follows international security standards. You have control but also ensure compatibility with other systems.
Why We’re Using Self-Managed Tokens
We’re choosing self-managed token generation for several reasons:
- Learning Purpose: It helps understand the fundamentals of JWT
- Complete Control: We can see every aspect of token generation
- Simplicity: No need to set up external services
- Perfect for Practice: Ideal for learning and small projects
When to Consider Other Options
As your application grows, consider switching to:
- Third-Party Providers when:
- You need enterprise-grade security
- You want built-in features (social login, MFA)
- You don’t want to maintain security infrastructure
- OAuth 2.0 Server when:
- You’re building multiple applications
- You need centralized authentication
- You want industry-standard protocols
Best Practices Regardless of Approach
No matter which approach you choose:
- Always use HTTPS
- Secure your secrets
- Implement proper token validation
- Consider token lifetime and renewal strategies
In our upcoming implementation, we’ll focus on self-managed tokens, but remember: this is a stepping stone to understanding more complex authentication scenarios you’ll encounter in larger applications.
Example: Advanced JWT Authentication in ASP.NET Core Minimal API
Disclaimer: This example is intended for educational purposes only. While it demonstrates key concepts, there are more efficient ways to write and optimize this code in real-world applications. Consider this a starting point for learning, and always aim to follow best practices and refine your implementation.
GitHub Repository
All the code is available in this GitHub repository and use the jwt-generation branch . This repository will help you easily apply the new modifications to the previously created code thanks to the use of tags and branches.
Prerequisites
Before starting, make sure you have the following installed:
- .NET SDK: Download and install the .NET SDK if you haven’t already.
- Visual Studio Code (VSCode): Install Visual Studio Code for a lightweight code editor.
- C# Extension for VSCode: Install the C# extension for VSCode to enable C# support.
- Rest Client for VSCode: Install REST Client extension to use .http files for testing the api.
Step 1: Setting Up the Project
Clone the repository:
git clone https://github.com/ottorinobruni/SecureWeatherApi.gitAdd the System.IdentityModel.Tokens.Jwt NuGet package:
dotnet add package System.IdentityModel.Tokens.Jwt
Step 2: Update Settings
Update the appsettings.json with JWT configuration
{
  "Jwt": {
    "Key": "Jwt_Secret_Key",
    "Issuer": "SecureApiWithJWT",
    "Audience": "SecureApiUsers",
    "ExpirationSeconds": 3600
  }
}
Step 2: Update Settings
Add a JwtSettings class to map the configuration:
public class JwtSettings
{
    public string Key { get; set; } = string.Empty;
    public string Issuer { get; set; } = string.Empty;
    public string Audience { get; set; } = string.Empty;
    public int ExpirationSeconds { get; set; }
}
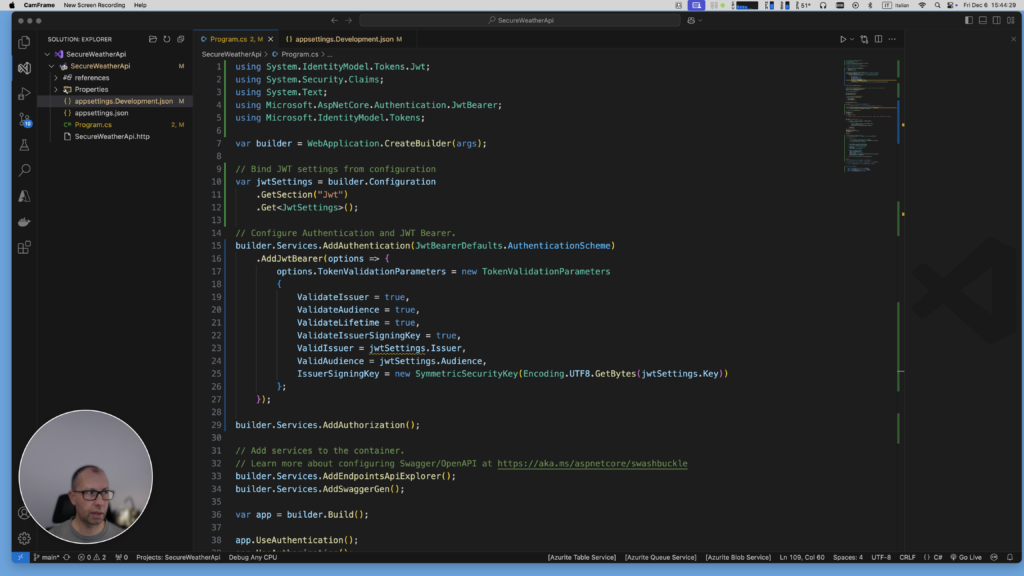
Step 3: Add JWT Authentication
Configure JWT authentication and authorization in Program.cs:
// Bind JWT settings from configuration
var jwtSettings = builder.Configuration
    .GetSection("Jwt")
    .Get<JwtSettings>();

// Configure Authentication and JWT Bearer.
builder.Services.AddAuthentication(JwtBearerDefaults.AuthenticationScheme)
    .AddJwtBearer(options => {
        options.TokenValidationParameters = new TokenValidationParameters
        {
            ValidateIssuer = true,
            ValidateAudience = true,
            ValidateLifetime = true,
            ValidateIssuerSigningKey = true,
            ValidIssuer = jwtSettings.Issuer,
            ValidAudience = jwtSettings.Audience,
            IssuerSigningKey = new SymmetricSecurityKey(Encoding.UTF8.GetBytes(jwtSettings.Key))
        };
    });
Step 4: Add Login Endpoint
The /login endpoint authenticates the user and issues a JWT access token if the credentials are valid. Here’s how it works:
// Login endpoint
app.MapPost("/login", (UserCredentials credentials) =>
{
    // Note: In production, never store credentials in code
    if (credentials.Username == "username" && credentials.Password == "password")
    {
        var token = GenerateAccessToken(credentials.Username, jwtSettings);
        return Results.Ok(new { AccessToken = token });
    }
    return Results.Unauthorized();
})
.WithName("Login")
.WithOpenApi();
Explanation:
- User Validation: The username and password are checked (hardcoded for demonstration). In a real application, validation would be done against a database or identity provider.
- Access Token Generation: If the credentials are valid, the
GenerateAccessTokenhelper method creates a JWT token. - Response: The endpoint returns the token in the response if the user is authenticated, otherwise, it returns a
401 Unauthorizedstatus.

Step 4: Token Generation Helper Method
The GenerateAccessToken method creates a signed JWT for the user. Here’s the implementation:
// Helper method for token generation
string GenerateAccessToken(string username, JwtSettings jwtSettings)
{
    var claims = new[]
    {
        new Claim(JwtRegisteredClaimNames.Sub, username),
        new Claim(JwtRegisteredClaimNames.Jti, Guid.NewGuid().ToString()),
        new Claim(ClaimTypes.Name, username)
    };

    var securityKey = new SymmetricSecurityKey(
        Encoding.UTF8.GetBytes(jwtSettings.Key));

    var credentials = new SigningCredentials(
        securityKey,
        SecurityAlgorithms.HmacSha256);

    var token = new JwtSecurityToken(
        issuer: jwtSettings.Issuer,
        audience: jwtSettings.Audience,
        claims: claims,
        expires: DateTime.UtcNow.AddSeconds(jwtSettings.ExpirationSeconds),
        signingCredentials: credentials);

    return new JwtSecurityTokenHandler().WriteToken(token);
}
Explanation:
- Claims: A set of claims (e.g.,
username, unique token ID) is added to the token to identify the user. - Signing Key and Credentials: The secret key (
jwtSettings.Key) is used to sign the token, ensuring its authenticity. - Token Configuration:
- The
issuerandaudienceare validated against the client’s request. - The
expiresproperty determines how long the token is valid.
- The
- Return Token: The method returns a signed JWT as a string.

Here is the full version of the code:
using System.IdentityModel.Tokens.Jwt;
using System.Security.Claims;
using System.Text;
using Microsoft.AspNetCore.Authentication.JwtBearer;
using Microsoft.AspNetCore.Mvc;
using Microsoft.IdentityModel.Tokens;

var builder = WebApplication.CreateBuilder(args);

// Bind JWT settings from configuration
var jwtSettings = builder.Configuration
    .GetSection("Jwt")
    .Get<JwtSettings>();

// Configure Authentication and JWT Bearer.
builder.Services.AddAuthentication(JwtBearerDefaults.AuthenticationScheme)
    .AddJwtBearer(options => {
        options.TokenValidationParameters = new TokenValidationParameters
        {
            ValidateIssuer = true,
            ValidateAudience = true,
            ValidateLifetime = true,
            ValidateIssuerSigningKey = true,
            ValidIssuer = jwtSettings.Issuer,
            ValidAudience = jwtSettings.Audience,
            IssuerSigningKey = new SymmetricSecurityKey(Encoding.UTF8.GetBytes(jwtSettings.Key))
        };
    });

builder.Services.AddAuthorization();

// Add services to the container.
// Learn more about configuring Swagger/OpenAPI at https://aka.ms/aspnetcore/swashbuckle
builder.Services.AddEndpointsApiExplorer();
builder.Services.AddSwaggerGen();

var app = builder.Build();

app.UseAuthentication();
app.UseAuthorization();

// Configure the HTTP request pipeline.
if (app.Environment.IsDevelopment())
{
    app.UseSwagger();
    app.UseSwaggerUI();
}

app.UseHttpsRedirection();

app.MapPost("/login", (UserCredentials credentials) =>
{
    if (credentials.Username == "username" && credentials.Password == "password")
    {
        var token = GenerateAccessToken(credentials.Username, jwtSettings);
        return Results.Ok(new { AccessToken = token });
    }
    return Results.Unauthorized();
})
.WithName("Login")
.WithOpenApi();

var summaries = new[]
{
    "Freezing", "Bracing", "Chilly", "Cool", "Mild", "Warm", "Balmy", "Hot", "Sweltering", "Scorching"
};

app.MapGet("/weatherforecast", () =>
{
    var forecast =  Enumerable.Range(1, 5).Select(index =>
        new WeatherForecast
        (
            DateOnly.FromDateTime(DateTime.Now.AddDays(index)),
            Random.Shared.Next(-20, 55),
            summaries[Random.Shared.Next(summaries.Length)]
        ))
        .ToArray();
    return forecast;
})
.RequireAuthorization()
.WithName("GetWeatherForecast")
.WithOpenApi();

app.Run();

// Helper method for token generation
string GenerateAccessToken(string username, JwtSettings jwtSettings)
{
    var claims = new[]
    {
        new Claim(JwtRegisteredClaimNames.Sub, username),
        new Claim(JwtRegisteredClaimNames.Jti, Guid.NewGuid().ToString()),
        new Claim(ClaimTypes.Name, username)
    };

    var securityKey = new SymmetricSecurityKey(
        Encoding.UTF8.GetBytes(jwtSettings.Key));

    var credentials = new SigningCredentials(
        securityKey,
        SecurityAlgorithms.HmacSha256);

    var token = new JwtSecurityToken(
        issuer: jwtSettings.Issuer,
        audience: jwtSettings.Audience,
        claims: claims,
        expires: DateTime.UtcNow.AddSeconds(jwtSettings.ExpirationSeconds),
        signingCredentials: credentials);

    return new JwtSecurityTokenHandler().WriteToken(token);
}

//Models
record UserCredentials(string Username, string Password);

record WeatherForecast(DateOnly Date, int TemperatureC, string? Summary)
{
    public int TemperatureF => 32 + (int)(TemperatureC / 0.5556);
}

public class JwtSettings
{
    public string Key { get; set; } = string.Empty;
    public string Issuer { get; set; } = string.Empty;
    public string Audience { get; set; } = string.Empty;
    public int ExpirationSeconds { get; set; }
}
Run Demo: Step-by-Step Guide
Step 1: Setting up the Secret Key
Before running the application, we need a valid secret key for signing the token, which must be added to the appsettings.json file under the Jwt section.
You can:
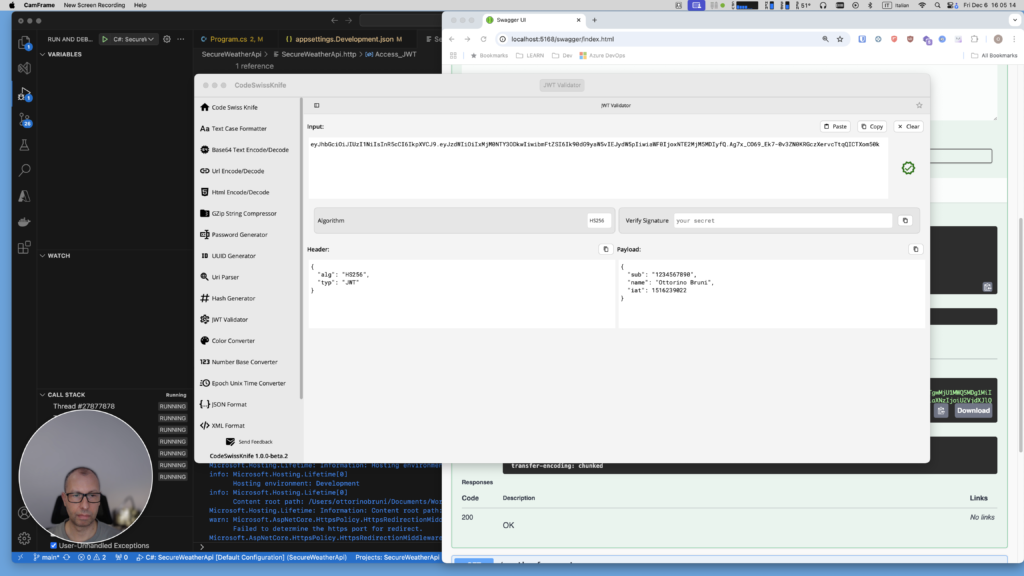
- Generate and validate a key with tools like jwt.io, where you can also decode and verify JWT tokens.
- Alternatively, I recommend using CodeSwissKnife, my powerful, offline developer utility designed to simplify your daily tasks. It offers a JWT Validator that allows you to decode and confirm the validity of JWTs, ensuring both their authenticity and the correctness of the payload.

Step 2: Running the Application
- Start the app by running it via your favorite IDE or CLI.
- Open Swagger in the browser (usually at
http://localhost:[port]/swagger) to access the interactive API interface.
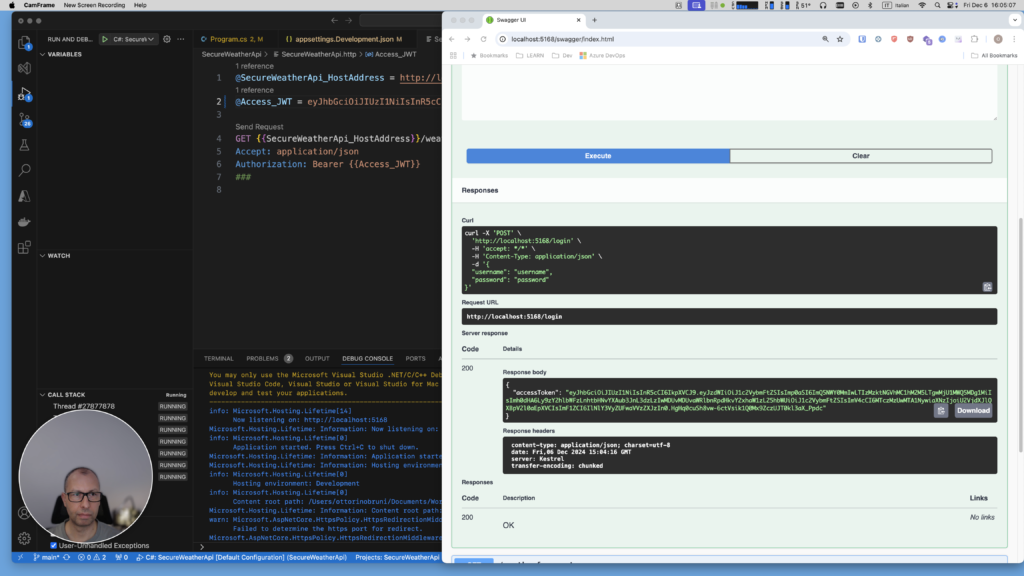
Step 3: Logging In
- Use the
/loginendpoint in Swagger. - Enter the demo credentials:
- Username:
username - Password:
password
- Submit the request, and you’ll receive a response containing the
accessToken. Copy this token, as you’ll need it for the next step.

Step 4: Making Authenticated Requests
- Open the file
SecureWeatherApi.http. - Replace the
@Access_JWTvariable with theaccessTokenyou just received. - Send the request to the
/weatherforecastendpoint by clicking Send Request. - You should see a list of weather forecasts returned by the API.
Using these steps, you can test and validate your API, ensuring that JWT authentication works effectively. Remember, properly managing your secret key and validating tokens are key to securing your application.

Conclusion
In this article, we explored how to manually generate and validate JWT tokens in an ASP.NET Core Minimal API. This approach gives us full control over the token creation and validation process, helping us understand the inner workings of JWT authentication. By building everything in-app, we’ve also gained a deeper appreciation for the complexity behind securing APIs.
However, it’s important to emphasize that this approach is primarily for learning purposes. While it works for small applications or prototyping, managing tokens in a production environment comes with serious security responsibilities. From securely storing signing keys to handling token expiration and revocation, there’s a lot to manage – and mistakes can lead to vulnerabilities.
For production-grade applications, it’s highly recommended to leverage dedicated identity providers or OAuth 2.0 authorization servers like:
- Third-party providers such as Auth0, Azure Active Directory, or Firebase Authentication, which offload the responsibility of token management and provide industry-grade security features.
- Self-hosted solutions like IdentityServer or Keycloak, which are great for applications requiring centralized authentication.
By making use of these tools, you can ensure that your application meets the highest security standards while saving significant development effort.
In the next part of this series, we’ll explore how to implement refresh tokens, allowing users to remain authenticated beyond the lifetime of a single access token, empowering your application with a more robust and seamless authentication flow.
If you think your friends or network would find this article useful, please consider sharing it with them. Your support is greatly appreciated.
Thanks for reading!
 Discover CodeSwissKnife, your all-in-one, offline toolkit for developers!
Click to explore CodeSwissKnife

DariusLamus
Good introduction to ASP.Net webapi authentication basics. For those not familiar with .http files and RestClient, you should mention Rest Client needs to be added as an extension to run SecureWeatherApi.http.
Ottorino Bruni
Thanks a lot for your comment, you are right. I have mentioned REST Client extension for Visual Studio Code to handle http file in this article https://www.ottorinobruni.com/mastering-api-prototyping-with-visual-studio-http-file-editor-cost-effective-alternative-to-postman/