How to Implement Entity Framework Core Migrations in a .NET Console Application Using C# and VSCode
Introduction to Entity Framework Core Migrations
In the previous articles, I discussed how to integrate SQLite with a .NET console application using C# and VSCode, and how to use Dapper for data access. You can find those articles at these links: SQLite with .NET Console Application, Using Dapper and Entity Framework Core in .NET Applications.
Now, I’ll guide you through the process of implementing migrations in Entity Framework Core within your .NET console applications. By the end of this tutorial, you’ll understand how to use migrations to manage database schema changes effectively, allowing for more maintainable and scalable applications. We’ll cover how to set up Entity Framework Core, create and apply migrations, and even handle rollbacks. This approach ensures your SQLite database remains in sync with your application’s evolving data model, all within the familiar environment of C# and VSCode.
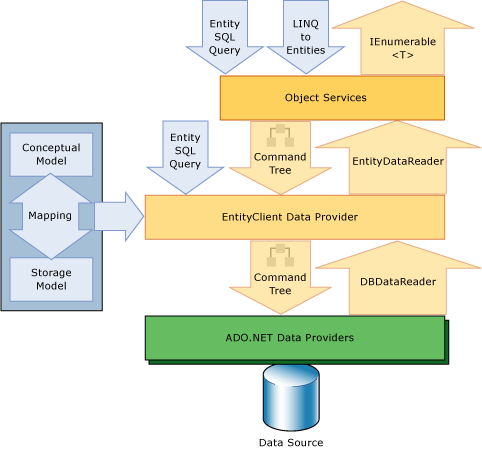
The following diagram illustrates the Entity Framework architecture for accessing data:
Migrations Overview
In software development, especially in larger projects, data models frequently change as new features are developed or existing ones are updated. These changes can include adding new entities, modifying properties, or removing outdated ones. To keep the database schema synchronized with the evolving application data model, EF Core provides a migrations feature.
Migrations offer a systematic way to manage database schema changes. Here’s an overview of how they work:
- Tracking Model Changes: When a change is made to the data model, developers can use EF Core tools to create a migration. EF Core compares the current data model with a snapshot of the model from the last migration. This comparison identifies the differences and generates a migration file that describes the necessary schema updates.
- Migration File Creation: The migration file includes code that specifies how to apply the changes to the database (in the
Up()method) and how to undo them (in theDown()method). These files are part of your project’s codebase, so they can be versioned and managed just like other source code, ensuring that schema changes are tracked and documented. - Applying Migrations: After creating a migration, it can be applied to the database to update its schema to match the application’s current state. EF Core maintains a special history table in the database that records which migrations have been applied. This ensures that the database can be kept in sync with the application across different environments.
Migrations are essential for managing changes in a controlled and consistent manner, ensuring that your database evolves alongside your application without losing data. The following sections will guide you step-by-step on how to use migrations effectively in your .NET projects.
Managing Migrations
As your application’s data model evolves, you will need to add and remove migrations to keep your database schema synchronized with your changes. Migrations are typically stored in your project’s source control, allowing for easy tracking and collaboration. To manage migrations, ensure that you have the EF Core command-line tools installed.
Adding a Migration
After making changes to your data model, you can create a new migration using the following command:
dotnet ef migrations add AddUserCreatedTimestamp
The migration name serves as a description of the changes, similar to a commit message in version control. For instance, AddBlogCreatedTimestamp indicates that a new CreatedTimestamp property has been added to the Blog entity.
Upon running the command, three files are generated in the Migrations directory:
- Main Migration File (
XXXXXXXXXXXXXX_AddCreatedTimestamp.cs): Contains the operations to apply the migration (in theUpmethod) and to undo it (in theDownmethod). - Migration Metadata File (
XXXXXXXXXXXXXX_AddCreatedTimestamp.Designer.cs): Stores metadata about the migration used by EF Core. - Model Snapshot (
MyContextModelSnapshot.cs): Represents the current state of the data model, helping EF Core to identify changes for future migrations.
These files are timestamped to maintain chronological order and reflect the sequence of changes over time.
Customizing Migration Code
While EF Core generates migration code automatically, it’s important to review and potentially modify it to ensure it correctly reflects the intended changes. For example, if a property is renamed, EF Core might mistakenly treat it as a column drop and add operation, leading to potential data loss. To handle a rename correctly, replace the auto-generated operations with a RenameColumn command.
In cases where more complex changes are required, such as combining fields, you might need to use raw SQL commands. For instance, to merge FirstName and LastName into a new FullName property, you can manually update the generated migration code to include SQL for data migration before dropping the old columns.
Removing a Migration
If you need to modify the data model further before applying a migration, you can remove the last migration with:
dotnet ef migrations remove
Be cautious not to remove migrations that have already been applied to production databases, as this can disrupt database integrity and future migrations.
Listing Migrations
To view all migrations that have been created, use:
dotnet ef migrations list
This command provides a list of all migrations, allowing you to track the progression of schema changes.
Example: Using Entity Framework Core Migrations with C# in VSCode
Disclaimer: This example is purely for educational purposes. There are better ways to write code and applications that can optimize this example. Use this as a starting point for learning, but always strive to follow best practices and improve your implementation.
GitHub Repository
All the code related to the use of SQLite, Dapper, and Entity Framework Core is available in this GitHub repository. This repository will help you easily apply the new modifications to the previously created code thanks to the use of tags and branches.
Install EF Core Tools if you haven’t already:
dotnet tool install --global dotnet-ef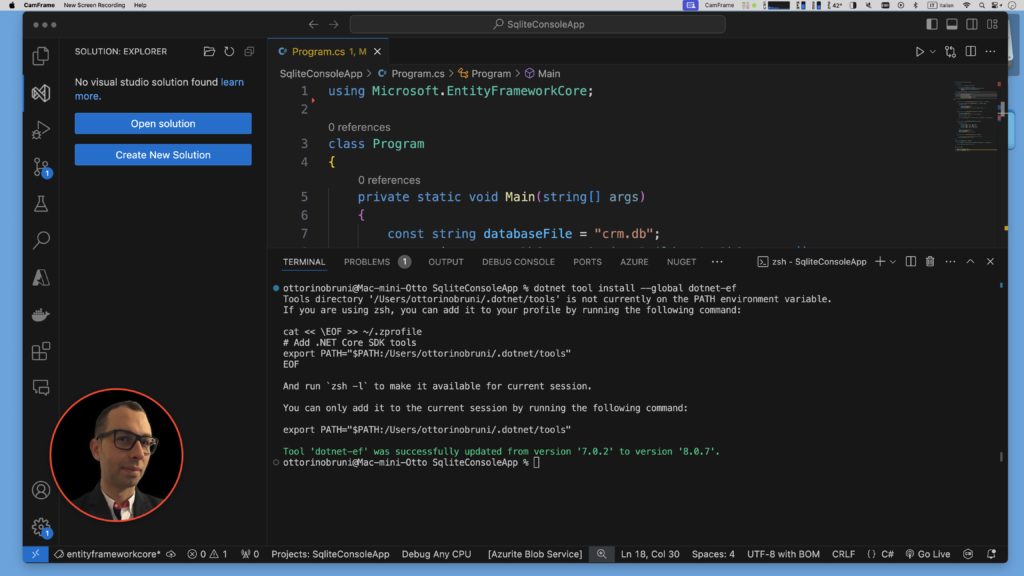
Overview of the Updated Console Application
The updated .NET console application demonstrates how to use Entity Framework Core (EF Core) with SQLite for database operations. The application includes functionalities to create a database, insert users, display all users, and delete a user by name. Additionally, the database file is managed efficiently to ensure that it is removed after the operations are completed.
Key Components
- Database Configuration and Context
- AppDbContext: This class represents the Entity Framework Core context for interacting with the SQLite database. It includes a
DbSet<User>property to manageUserentities. TheOnConfiguringmethod is overridden to specify the SQLite connection string, which in this case points to a file namedcrm.db.
- AppDbContext: This class represents the Entity Framework Core context for interacting with the SQLite database. It includes a
public class AppDbContext : DbContext
{
  public string DbPath { get; }
  public DbSet<User> Users { get; set; }

  public AppDbContext()
  {
    DbPath = "crm.db";
  }

  protected override void OnConfiguring(DbContextOptionsBuilder options)
    => options.UseSqlite($"Data Source={DbPath}");
}
- Main Program Logic
-
- Main Method: The
Mainmethod initializes theAppDbContext, ensures the database is created, and performs CRUD operations. It first creates the database (if not already present), inserts a set of users, displays all users, deletes a user named “Otto”, and then displays the remaining users. After completing the operations, the database file is deleted.
- Main Method: The
private static void Main(string[] args)
{
  using (var context = new AppDbContext())
  {
    context.Database..Migrate();
    CreateTable(context);
    InsertUsers(context);
    DisplayAllUsers(context);
    DeleteUserByName(context, "Otto");
    DisplayAllUsers(context);
  }

  //File.Delete(databaseFile);
  //System.Console.WriteLine("Database file deleted!");
}
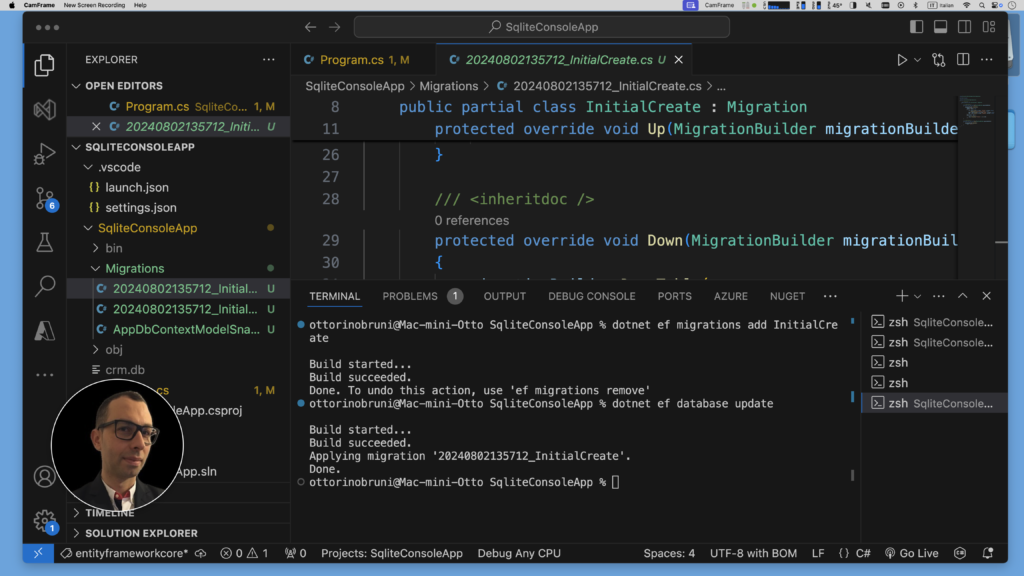
Add the migration:
dotnet ef migrations add InitialCreateThis command will create a migration named InitialCreate that includes the current model’s schema (the User class in this case).
Apply the migration:
dotnet ef database updateThis command applies the migration and creates the database schema based on the defined model.
Next Steps
With the initial migration applied, you’re now ready to add new migrations as your data model evolves. For example, to add an Email property to the User class:
- Update the
Userclass:public class User { public int Id { get; set; } public string Name { get; set; } public int Age { get; set; } public string Email { get; set; } // New property } - Create a new migration:
dotnet ef migrations add AddUserEmail - Apply the new migration:
dotnet ef database update
These steps will modify the database schema to include the new Email column.
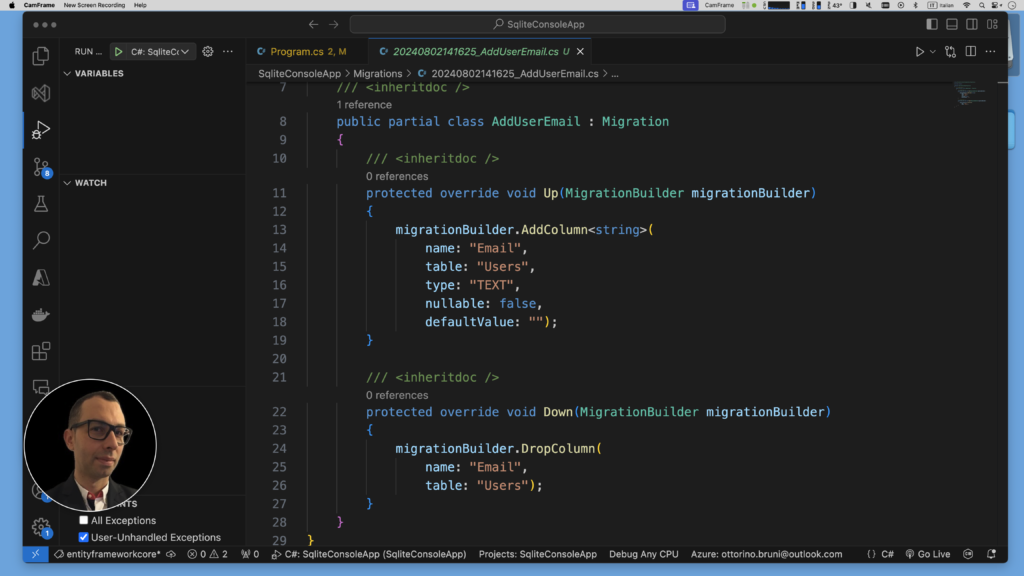
This is the complete code you can find in the GitHub repository.
using Microsoft.Data.Sqlite;
using Microsoft.EntityFrameworkCore;
class Program
{
private static void Main(string[] args)
{
using (var context = new AppDbContext())
{
context.Database.Migrate();
CreateTable(context);
InsertUsers(context);
DisplayAllUsers(context);
DeleteUserByName(context, “Otto”);
DisplayAllUsers(context);
}
// File.Delete(databaseFile);
// Console.WriteLine(“Database file deleted!”);
}
private static void DeleteUserByName(AppDbContext context, string name)
{
var user = context.Users.SingleOrDefault(u => u.Name == name);
if (user != null)
{
context.Users.Remove(user);
context.SaveChanges();
Console.WriteLine($”User with name ‘{name}’ deleted.”);
}
}
private static void DisplayAllUsers(AppDbContext context)
{
var users = context.Users.ToList();
Console.WriteLine(“Current users in the database:”);
foreach (var user in users)
{
Console.WriteLine($”ID: {user.Id}, Name: {user.Name}, Age: {user.Age}, Email: {user.Email}”);
}
}
private static void InsertUsers(AppDbContext context)
{
var users = new[]
{
new User { Name = “Otto”, Age = 30, Email = “otto@example.com” },
new User { Name = “Tim”, Age = 25, Email = “tim@example.com” },
new User { Name = “Steve”, Age = 28, Email = “steve@example.com” },
new User { Name = “Robert”, Age = 35, Email = “robert@example.com” }
};
context.Users.AddRange(users);
context.SaveChanges();
Console.WriteLine(“Users inserted.”);
}
private static void CreateTable(AppDbContext context)
{
// Table creation is handled by EnsureCreated method
Console.WriteLine(“Table created.”);
}
}
public class AppDbContext : DbContext
{
public string DbPath { get; }
public DbSet<User> Users { get; set; }
public AppDbContext()
{
DbPath = “crm.db”;
}
protected override void OnConfiguring(DbContextOptionsBuilder options)
=> options.UseSqlite($”Data Source={DbPath}”);
}
public class User
{
    public int Id { get; set; }
    public string Name { get; set; }
    public int Age { get; set; }
    public string Email { get; set; } // New property
}
Description of the Code
This C# console application uses Entity Framework Core to interact with a SQLite database, performing CRUD (Create, Read, Update, Delete) operations on a User entity. The code demonstrates how to set up, manipulate, and manage a SQLite database in a .NET application.
Key Components:
- Main Program (
MainMethod):- Database Migration:
context.Database.Migrate()is called to apply any pending migrations. This ensures that the database schema is updated to match the current model. - Table Management: Although
EnsureCreatedis not used here, theCreateTablemethod is intended for table setup. In practice, EF Core handles table creation through migrations. - User Operations:
- Insert Users:
InsertUsersmethod adds a set of predefined users to the database. - Display Users:
DisplayAllUsersmethod retrieves and displays all users from the database. - Delete User:
DeleteUserByNamemethod removes a user with a specific name from the database and prints a confirmation message.
- Insert Users:
- File Deletion: The code contains commented-out lines for deleting the database file (
File.Delete(databaseFile)) and printing a deletion message. This is useful for cleanup in development but typically not used in production.
- Database Migration:
- Database Context (
AppDbContextClass):- Constructor: Initializes the
DbPathproperty to specify the SQLite database file path (crm.db). - OnConfiguring Method: Configures Entity Framework Core to use SQLite with the specified
DbPath.
- Constructor: Initializes the
- User Entity (
UserClass):- Represents the data model with four properties:
Id,Name,Age, andEmail. TheEmailproperty is a new addition to theUserentity.
- Represents the data model with four properties:
- CRUD Methods:
- InsertUsers: Adds a list of
Userobjects to the database and saves changes. - DisplayAllUsers: Queries all
Userentities and prints their details. - DeleteUserByName: Finds and removes a user by their name, then saves changes.
- InsertUsers: Adds a list of
By following this approach, you ensure that your database schema remains in sync with your application model through a controlled and trackable process.
Run the Application
Compile and run your application to see the results.
dotnet runYou should see the table creation, insertion of users, display of all users, deletion of a user, and the final display of users. The database file will be deleted at the end.

Conclusion
Migrations in Entity Framework Core (EF Core) are a feature that allows you to manage and apply changes to your database schema in a systematic and controlled manner. They represent a sequence of changes that reflect updates to your data model, defined in your entity classes and DbContext.
When you make changes to your data model, such as adding new properties or modifying existing ones, you need to synchronize the database schema with these updates. Migrations help you to create and manage these changes through code files that describe the operations needed to update or revert the database schema to match your desired state.
Advantages of Migrations
- Systematic Schema Management: Migrations provide a structured way to apply incremental changes to your database schema, ensuring that each change is tracked and managed over time.
- Preservation of Data: Unlike recreating the database from scratch, migrations allow you to modify the schema while preserving existing data. This minimizes disruption and data loss during updates.
- Version Control: Migration files can be checked into source control, allowing you to track changes over time, collaborate with others, and roll back changes if necessary.
- Automated Updates: EF Core can automatically apply pending migrations to keep the database schema in sync with your data model, reducing the need for manual database management.
- Customization: You can customize the migration code to handle complex schema changes or to execute raw SQL commands when needed.
Importance in Application Development
In application development, migrations are crucial for several reasons:
- Evolving Models: As your application evolves, so will your data model. Migrations help manage these changes smoothly without needing to drop and recreate the database, which would lead to data loss.
- Collaborative Development: When working in a team, migrations ensure that everyone is working with the same database schema. By committing migration files to version control, team members can apply the same changes to their local databases.
- Deployment: When deploying updates to production environments, migrations ensure that your database schema remains consistent with the application’s data model. They allow you to apply changes incrementally and safely.
- Testing and Maintenance: Migrations facilitate testing and maintenance by allowing you to apply and revert changes as needed, helping to keep your development, testing, and production environments in sync.
Overall, migrations are a powerful feature in EF Core that help manage database schema changes effectively, ensuring that your application and database schema evolve together seamlessly.
If you think your friends or network would find this article useful, please consider sharing it with them. Your support is greatly appreciated.
Thanks for reading!