
How to Use Output Caching for Faster Results in ASP.NET Core Minimal API
Introduction
In modern web development, performance optimization is crucial for delivering exceptional user experiences. While traditional caching mechanisms like Response Caching have served us well, ASP.NET Core introduces a more powerful and flexible solution: Output Caching. This new middleware represents a significant evolution in how we handle caching in web applications, offering enhanced control and efficiency.
In this article, we’ll explore Output Caching in detail, understand its advantages over Response Caching, and implement it in an ASP.NET Core Minimal API. Whether you’re building a high-traffic website or optimizing API performance, this guide will help you leverage Output Caching effectively.
Understanding Output Caching
What is Output Caching?
Output Caching is a server-side caching mechanism that stores the complete output of an HTTP response, including:
- Response body
- Status codes
- Headers
- Content type information
When implemented, it intercepts incoming requests and serves cached responses without executing the endpoint logic, significantly reducing server load and response times.
Output Caching represents a significant advancement over traditional Response Caching in ASP.NET Core, offering more robust and flexible caching capabilities. Unlike Response Caching, which relies on HTTP headers and can be influenced by client-side behavior, Output Caching gives developers complete server-side control over caching policies.
The middleware’s key advantages include extensible storage options beyond just memory, programmatic cache invalidation capabilities, and built-in protection against cache stampede through resource locking mechanisms. Additionally, Output Caching implements bandwidth optimization through cache revalidation, allowing servers to return 304 Not Modified responses instead of full response bodies when content hasn’t changed.
This server-controlled approach ensures consistent caching behavior across all clients, regardless of their browser settings or HTTP headers, making it particularly valuable for modern web applications that require precise control over their caching strategy.
Output Caching vs Response Caching: Key Differences
Let’s compare these two caching approaches:
| Feature | Output Caching | Response Caching |
|---|---|---|
| Implementation | Server-side only | Both server and client-side |
| Control | Fine-grained control through policies | HTTP header-based control |
| Cache Invalidation | Supports cache tags and custom policies | Based on HTTP cache headers |
| Flexibility | More flexible with policy-based configuration | Limited to HTTP caching standards |
| Cache Variation | Multiple options (query strings, headers, custom rules) | Limited to HTTP Vary header |
| Storage Location | Server memory only | Browser, proxy, and server |
If you’re interested in further optimizing your caching strategies, check out my previous articles on How to Implement In-Memory Caching in .NET Console App Using C# and How to Implement Redis Cache in .NET using Minimal APIs and C#. Both provide valuable techniques that complement the output caching insights shared here.
Key Benefits of Output Caching
- Enhanced Performance
- Reduces server processing time
- Minimizes database queries
- Improves application scalability
- Greater Control
- Custom cache policies
- Fine-grained cache invalidation
- Flexible cache variation options
- Resource Optimization
- Reduces server load
- Optimizes memory usage
- Improves application responsiveness
Example: Implement Response Caching in ASP.NET Core Minimal API
Disclaimer: This example is intended for educational purposes only. While it demonstrates key concepts, there are more efficient ways to write and optimize this code in real-world applications. Consider this a starting point for learning, and always aim to follow best practices and refine your implementation.
In this example, we’ll demonstrate how to implement Output Caching in an ASP.NET Core Minimal API. You’ll see how to:
- Introduce variations in caching behavior using the
VaryByHeader. - Configure the
ResponseCacheattribute to cache GET responses for 10 seconds. - Use middleware to inspect cache behavior and provide custom headers.
Prerequisites
Before starting, make sure you have the following installed:
- .NET SDK: Download and install the .NET SDK if you haven’t already.
- Visual Studio Code (VSCode): Install Visual Studio Code for a lightweight code editor.
- C# Extension for VSCode: Install the C# extension for VSCode to enable C# support.
Step 1: Create a Minimal API
dotnet new webapi -minimal -n OutputCachingApi
cd OutputCachingApi
Step 2: Set Up Output Caching
The first step is to integrate Output Caching Middleware into your ASP.NET Core Minimal API pipeline. This middleware handles caching logic and serves responses directly from the cache when possible, bypassing the endpoint logic entirely.
To enable Output Caching:
- Register the
OutputCacheservice within thebuilder.Services.AddOutputCache()method. - Call
app.UseOutputCache()in the middleware pipeline to enable the caching system.
Here’s how the setup looks inside the Program.cs file:
builder.Services.AddOutputCache();   // Register output caching service
...
app.UseOutputCache();                // Enable the middleware
Step 3: Define the Endpoint
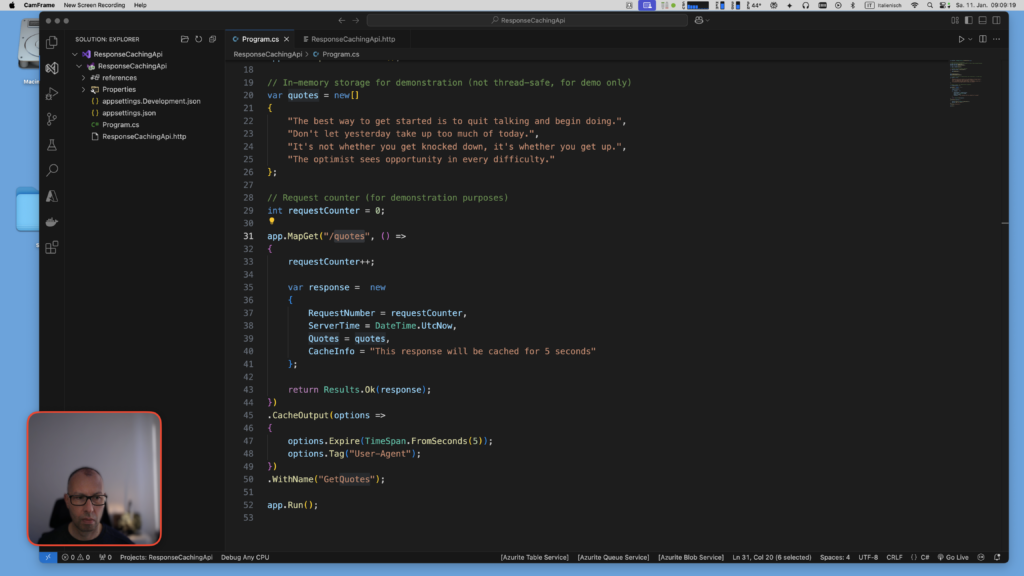
Our example demonstrates a /quotes endpoint that returns a collection of motivational quotes, along with a request counter and the current server time for demonstration purposes. The endpoint is configured to:
- Increment the request counter on every call.
- Enable output caching for 5 seconds, so repeated calls within that duration will reuse the cached response.
Here’s the endpoint definition:
app.MapGet("/quotes", () =>
{
    requestCounter++;

    var response = new
    {
        RequestNumber = requestCounter,    // Incremented for every request
        ServerTime = DateTime.UtcNow,     // Tracks current time (cached output will not update during cache duration)
        Quotes = quotes,                  // Array of motivational quotes
        CacheInfo = "This response will be cached for 5 seconds"
    };

    return Results.Ok(response);          // Return the response
})
.CacheOutput(options =>
{
    options.Expire(TimeSpan.FromSeconds(5));  // Cache response for 5 seconds
    options.Tag("User-Agent"); // Ensure caching behavior varies by User-Agent (optional)
})
.WithName("GetQuotes");
Step 4: Enable Output Caching for the Endpoint
The CacheOutput method is used to enable caching on the specific endpoint. For this example:
- 5-Second Expiry Time: We configure the cache to expire after 5 seconds so that the response is reused for subsequent requests during that period.
- Vary by User-Agent: We use the
Tag("User-Agent")option, ensuring that separate caches are created for different user agents (like browsers or API tools).
Here’s how you configure it:
.CacheOutput(options => {
  // Set cache expiry duration
  options.Expire(TimeSpan.FromSeconds(5));

  // Vary cache by the User-Agent header
  options.Tag("User-Agent");
 })
Step 5: Overall Pipeline Setup
Here’s the full setup of your Program.cs file, including middleware and endpoint configuration:
var builder = WebApplication.CreateBuilder(args);

// Add services to the container.
// Learn more about configuring OpenAPI at https://aka.ms/aspnet/openapi
builder.Services.AddOpenApi();
builder.Services.AddOutputCache();

var app = builder.Build();

// Configure the HTTP request pipeline.
if (app.Environment.IsDevelopment())
{
    app.MapOpenApi();
}

app.UseOutputCache();
app.UseHttpsRedirection();

// In-memory storage for demonstration (not thread-safe, for demo only)
var quotes = new[]
{
    "The best way to get started is to quit talking and begin doing.",
    "Don't let yesterday take up too much of today.",
    "It's not whether you get knocked down, it's whether you get up.",
    "The optimist sees opportunity in every difficulty."
};

// Request counter (for demonstration purposes)
int requestCounter = 0;

app.MapGet("/quotes", () =>
{
    requestCounter++;

    var response =  new
    {
        RequestNumber = requestCounter,
        ServerTime = DateTime.UtcNow,
        Quotes = quotes,
        CacheInfo = "This response will be cached for 5 seconds"
    };

    return Results.Ok(response);
})
.CacheOutput(options =>
{
    options.Expire(TimeSpan.FromSeconds(5));
    options.Tag("User-Agent");
})
.WithName("GetQuotes");

app.Run();
Explanation of How Output Caching Works
When you enable output caching using the CacheOutput method or the [OutputCache] attribute, the Output Caching Middleware intercepts requests and stores their responses in the cache for a specified duration.
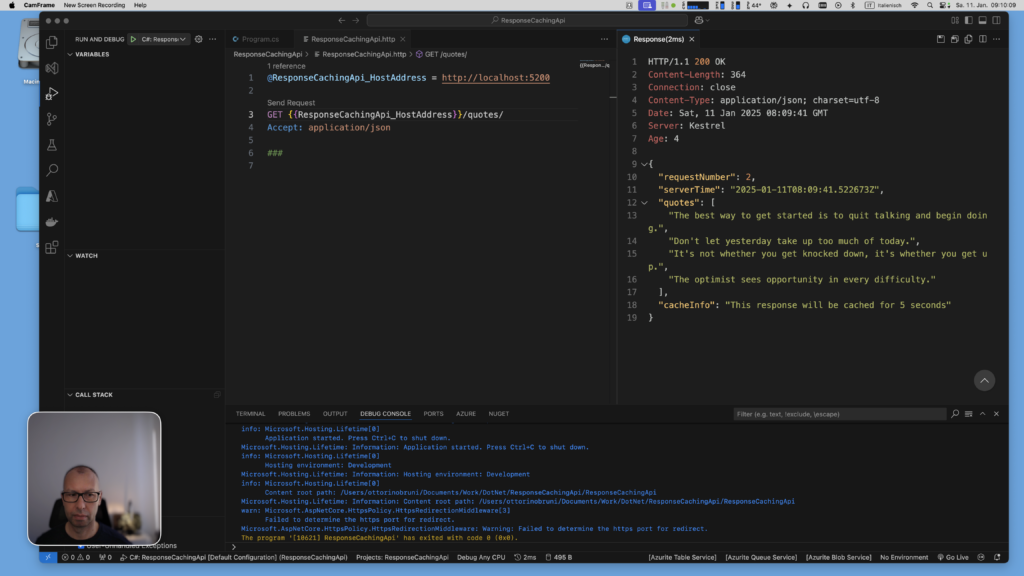
- First Request: When a client requests the
/quotesendpoint for the first time, the application logic is executed, and the response is generated fresh. The middleware stores this response in the cache.
Example:RequestNumber:1ServerTime:2025-01-10T15:00:00
- Subsequent Requests (Cached): For all requests within 5 seconds of the first request, the middleware serves the cached response without executing the endpoint logic again. Example:
- The
RequestNumberremains1(cached value). - The
ServerTimeremains2025-01-10T15:00:00.
- The
- Cache Expiry: After 5 seconds, the cache expires, and the next request is processed from scratch. The endpoint logic runs and generates a new value for
RequestNumberandServerTime.
Final Thoughts
Output Caching in ASP.NET Core is an easy and highly effective way to improve the performance of APIs by caching entire responses on the server side. This dramatically reduces server workload for frequently accessed resources like static data or rarely-changing endpoints.
By following the steps in this guide, you can add fine-tuned output caching to your Minimal APIs, ensuring optimized performance and a faster user experience. You can also build upon this foundation by varying cached responses using headers, query parameters, or other keys, depending on your application’s needs.
For more details on output caching, check out the official ASP.NET Core Documentation.
If you think your friends or network would find this article useful, please consider sharing it with them. Your support is greatly appreciated.
Thanks for reading!
 Discover CodeSwissKnife, your all-in-one, offline toolkit for developers!
Click to explore CodeSwissKnife 