How to Build Your First Microsoft Blazor App: A Step-by-Step Guide
Introduction
Welcome to my Blazor coding adventure! If you’re new to this powerful UI framework, I recommend checking out my previous article for an insightful overview of Blazor’s capabilities and key considerations.
In this step-by-step guide, we’ll explore the creation of your first Microsoft Blazor app, providing a comprehensive walkthrough from project initiation to employing key components such as EmployeeCard and EmployeeList. Whether you’re a novice or an experienced developer, this tutorial ensures a robust understanding of Microsoft Blazor’s capabilities. Let’s delve into the intricate details of Blazor development and elevate your web application expertise.
In this guide, we’ll be using Visual Studio Code, a free and versatile code editor. This choice ensures compatibility and a seamless experience, regardless of whether you’re on Windows or Mac
Ready to join me on this exciting Blazor journey? Let’s get started!
Prerequisites
- C# .NET and web app concepts experience
- Local installations of the .NET SDK and Visual Studio Code
- C# extension for Visual Studio Code
Getting Started with .NET
In the initial steps of our journey, we’ll need to ensure we have the latest version of .NET installed on our system. If you haven’t already, head over to dotnet.microsoft.com to download and install the latest version of .NET. This step is crucial to ensure compatibility and access to the latest features and enhancements.
Let’s verify the installation.
Open your terminal and run the following commands:
- To check if .NET is installed:
dotnet
This command should display information about the .NET CLI (Command-Line Interface)
- To list the installed SDKs:
dotnet --list-sdks
This command will provide a list of installed SDKs on your machine. Ensure that the version you downloaded is listed here.
Creating Your BlazorDemo Project
Fantastic! With the latest version of .NET installed, we’re all set to begin creating our BlazorDemo project. Open your terminal and run the following command:
dotnet new blazor -n BlazorDemo
This command creates a new Blazor project named “BlazorDemo.” The -n flag allows you to specify the name of your project.
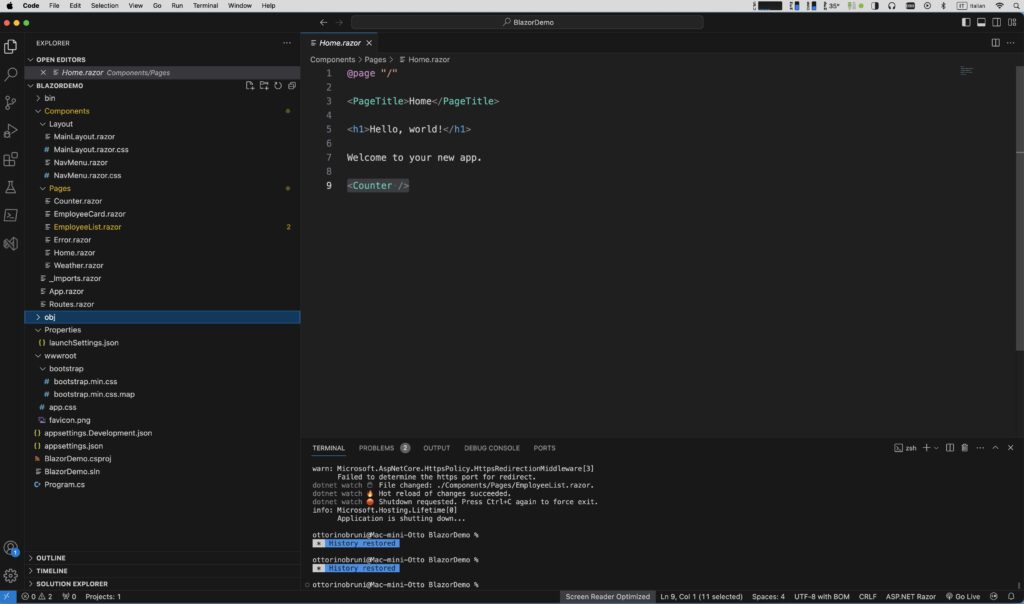
Now that we’ve successfully created our BlazorDemo project, let’s take a closer look at its internal structure.

As we explore our BlazorDemo project, let’s get to know some essential building blocks. Think of them as the behind-the-scenes organizers that make our app work smoothly.
First up, we have the ‘Components’ folder – a place for layout pieces like the main menu that keep our app looking consistent. Next, there’s the ‘Pages’ folder, where we find different pages or parts of our app neatly arranged. Lastly, we’ll peek into ‘App.razor,’ our app’s main planner that decides how everything fits together.
Running Your BlazorDemo Application
Now that we’ve set up our BlazorDemo project, let’s take it for a spin! You have two options to run it: using the terminal or leveraging the features of Visual Studio Code.
Option 1: Using Terminal If you’re a fan of the command line, follow these steps:
- Open your terminal.
- Navigate to the project’s root directory.
- Type the command:
dotnet watch run
This command not only launches our application but also keeps an eye out for any changes. If you modify your code, the server will automatically restart, ensuring a smooth development experience.
Option 2: Using Visual Studio Code For Visual Studio Code enthusiasts, you have a couple of choices:
- Utilize the built-in terminal.
- Navigate to the ‘Run’ menu and select ‘Run Without Debugging’ to kickstart our Blazor application.
Visual Studio Code offers a user-friendly environment, making development tasks a breeze.

Reusing Components Across Pages
As we continue our Blazor journey, let’s uncover a powerful aspect of Blazor development – the ability to reuse components across multiple pages. This not only streamlines our coding process but also enhances the modularity of our application.
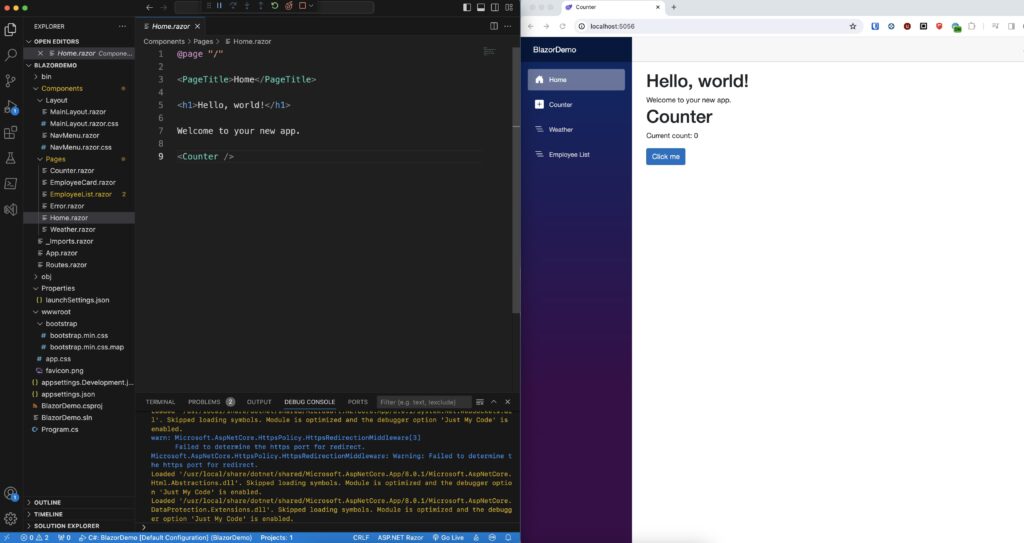
In the following example, we’ll take a closer look at how to reuse a component, specifically the Counter component, within our Home page. It’s a simple yet impactful demonstration of how Blazor empowers us to create modular, reusable user interface elements.
- Navigate to Project Explorer:
- Expand project folders in Visual Studio Code.
- Select ‘Components/Pages’ to view existing Razor pages.
- Open Home.razor:
- Find and open the ‘Home.razor’ file in the ‘Pages’ folder.
- Insert Counter Component:
@page "/"

<h1>Hello, world!</h1>

Welcome to your new app.

<Counter />
- Save and Refresh:
- Save the file to trigger a restart.
- Witness the Counter component on the refreshed Home page.
After saving the file in Visual Studio Code, refresh the app by either debugging it or running the dotnet watch run command. This will restart the application, ensuring the Counter component becomes visible on the Home page. If you’re using Visual Studio, you can achieve the same result by selecting the Hot Reload button to restart the app.
Introducing the EmployeeCard and EmployeeList Components
Imagine we want to create a straightforward list of employees. Let’s go ahead and create an EmployeeCard component that will be displayed within the EmployeeList page.
Creating the EmployeeCard Component:
Execute the following command to generate the EmployeeCard component:
dotnet new razorcomponent -n EmployeeCard -o Components/Pages
This command creates the EmployeeCard component, placing it in the ‘Components/Pages’ directory. With this newly generated component, we’re one step closer to building our employee list in the BlazorDemo project.
<div class="card" style="width: 18rem; margin-bottom: 16px;padding: 16px;">
  <div class="card-text text-center">
    <img src="https://robohash.org/@EmployeeId"class="card-img-top rounded-circle" style="width: 100px; height: 100px; object-fit: cover;background-color: cyan">
  </div>
  <div class="card-body">
    <h5 class="card-title text-center"><b>@FullName</b></h5>
    <h6 class="card-text"><b>ID</b>: <small>@EmployeeId</small></h6>
    <h6 class="card-text"><b>Email</b>: <small>@Email</small></h6>
  </div>
</div>

@code {
   [Parameter] public string FullName { get; set; } = "";
   [Parameter] public int EmployeeId { get; set; } = 0;
   [Parameter] public string Email { get; set; } = "";
}
This code represents the structure of the EmployeeCard component. Let’s go through its key components:
<div class="card">: This is the outer container for our card, styled with Bootstrap classes to create a card-like appearance.<img>: Displays an image using the source URL generated withhttps://robohash.org/@EmployeeId. This is often used for placeholder images. The image is styled as a circular avatar with a cyan background.<div class="card-body">: This section contains the body of our card, where employee details are displayed.<h5 class="card-title">: Displays the employee’s full name in a larger font size and centered.<h6 class="card-text">: Displays the employee’s ID and email in smaller font sizes. The ID is styled with a<small>element.
The @code block contains parameters used to pass data into the component: FullName, EmployeeId, and Email. These parameters allow dynamic content based on the values provided when using the EmployeeCard component.
Creating the EmployeeList Page:
Execute the following command to generate the EmployeeList component:
dotnet new razorcomponent -n EmployeeList -o Components/Pages
Now, let’s add the following code to the EmployeeList.razor file:
@page "/employeelist"

<h3>Employee List</h3>
<div class="employee-list">
  @foreach (var employee in Employees)
  {
    <EmployeeCard FullName="@employee.FullName" EmployeeId="@employee.EmployeeId" Email="@employee.Email"/>
  }
</div>

@code {

  public class Employee
  {
    public string FullName { get; set; }
    public int EmployeeId { get; set; }
    public string Email { get; set; }
  }

  List<Employee> Employees=new List<Employee>
  {
    new Employee { FullName="Orville Mckee", EmployeeId=10001, Email="orville.mckee@example.com" },
    new Employee { FullName="Deb Wiley", EmployeeId=20002, Email="deb.wiley@example.com" },
    new Employee { FullName="Jeri Good", EmployeeId=30003, Email="jeri.good@example.com" },
    new Employee { FullName="Ottorino Bruni", EmployeeId=40003, Email="ottorino.bruni@example.com" },
  };
}
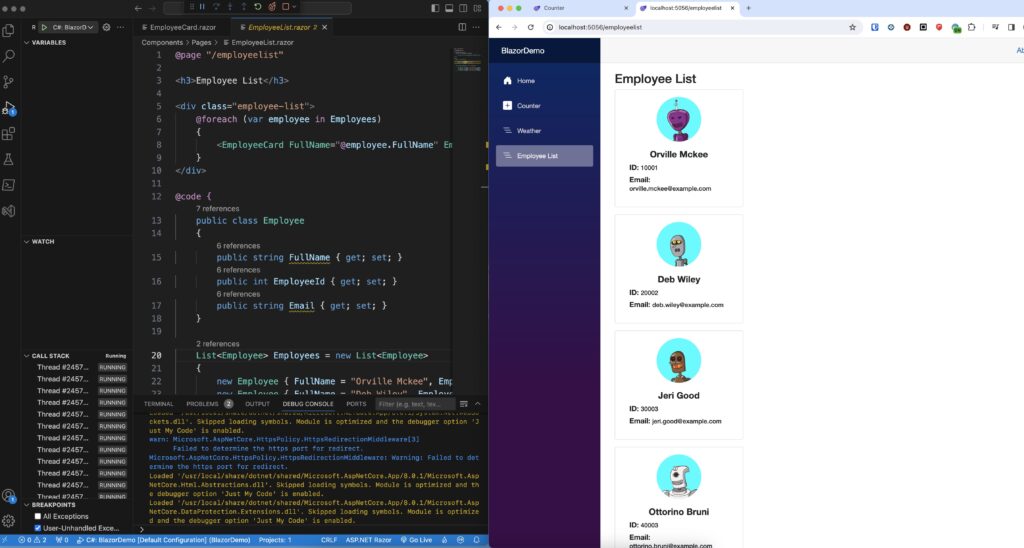
This code defines the EmployeeList page. It displays a list of employees using the EmployeeCard component. The @foreach loop iterates through the Employees list, and for each employee, it renders an EmployeeCard with the corresponding details.
Running the Employee List Demo:
Fantastic! With our components in place, let’s execute the code and witness the employee list in action.
- Ensure you have saved all your files.
- If you’re using Visual Studio Code, run the command:
dotnet watch run
This will start the BlazorDemo application and keep an eye on any changes.
- Open your browser.
- Voilà! You should now see a visually appealing list of employees, each represented by an EmployeeCard with personalized details.

If you’re interested in exploring the source code of this project, you can find it on GitHub.
If you think your friends/network would find this useful, please share it with them. I’d really appreciate it.
Thanks for reading!
 Discover CodeSwissKnife, your all-in-one, offline toolkit for developers!
Click to explore CodeSwissKnife

