Using CancellationTokens in .NET Minimal APIs: Boost Performance and Responsiveness
Introduction: Why Responsiveness Matters in Modern .NET Applications
In today’s world of modern software development, creating responsive and high-performing applications isn’t just a luxury it’s a necessity. Whether you’re building REST APIs, web applications, or microservices, chances are you’re working with asynchronous operations. These operations are often long-running and involve expensive tasks like database queries, external API calls, or file I/O processing.
While asynchronous programming in .NET provides an efficient way to handle such tasks, it also comes with challenges. One key problem is what happens when a request takes longer than expected, or worse, if the client abandons the request entirely? Without proper handling, you may find your application wasting valuable resources processing tasks that are no longer needed leading to increased latency and degraded performance.
This is where the concept of cancellation comes into play. By implementing CancellationTokens in your .NET Minimal APIs, you can ensure that these unnecessary tasks are gracefully canceled, saving compute power and enhancing the responsiveness of your application.
In this article, we’ll explore how CancellationTokens work and show you how to integrate them into a .NET Minimal API to improve overall performance and responsiveness. Let’s dive in!
What Is a CancellationToken in .NET?
A CancellationToken is a fundamental part of the System.Threading namespace in .NET, designed to handle cooperative cancellation in asynchronous programming scenarios. It allows multiple tasks, threads, or operations to work together and gracefully stop execution when a cancellation is requested.
At its core, a CancellationToken acts as a signal that allows code to communicate when a task should be canceled. However, it doesn’t enforce the cancellation itself. Instead, it enables any number of operations such as threads, tasks, or even custom work items—to listen for cancellation requests and respond appropriately.
To use a CancellationToken, you typically create it via a CancellationTokenSource. Here’s a quick breakdown of how it works:
- A
CancellationTokenSourceis the object responsible for managing the cancellation. - You retrieve the token from the
CancellationTokenSource.Tokenproperty. - The token is then passed to methods, tasks, or operations that might need to monitor cancellation.
- Once cancellation is triggered by calling
CancellationTokenSource.Cancel, theIsCancellationRequestedproperty on the token is set totrue. - Each operation that uses the token can decide how to respond to the cancellation for example, by short-circuiting execution or cleaning up resources.
By enabling graceful cancellation, a CancellationToken helps avoid wasting resources on operations that are no longer necessary.
Example: Building a Minimal API in .NET with CancellationToken for Long-Running Operations
Disclaimer: This example is intended for educational purposes only. While it demonstrates key concepts, there are more efficient ways to write and optimize this code in real-world applications. Consider this a starting point for learning, and always aim to follow best practices and refine your implementation.
Prerequisites
Before starting, make sure you have the following installed:
- .NET SDK: Download and install the .NET SDK if you haven’t already.
- Visual Studio Code (VSCode): Install Visual Studio Code for a lightweight code editor.
- C# Extension for VSCode: Install the C# extension for VSCode to enable C# support.
Step 1: Set Up the Minimal API Project
Open a terminal or command prompt and create a new directory for the project:

mkdir CancellationTokenMinimalApi && cd CancellationTokenMinimalApi
dotnet new web
code .
dotnet restore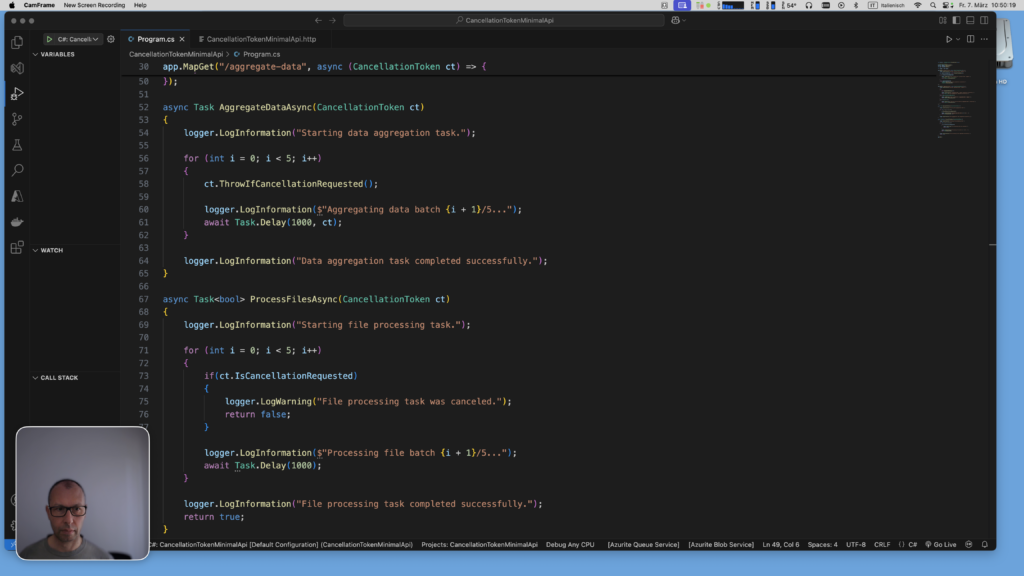
Step 2: Implement the Minimal API with CancellationToken
Replace the content of your Program.cs with the following code:
var builder = WebApplication.CreateBuilder(args);

// Configure Logging
builder.Logging.ClearProviders();
builder.Logging.AddConsole();
var app = builder.Build();

var logger = app.Logger;

app.MapGet("/process-files", async (CancellationToken ct) => {
    logger.LogInformation("Started 'process-files' endpoint.");

    bool operationCompleted = await ProcessFilesAsync(ct);

    if (ct.IsCancellationRequested)
    {
        logger.LogWarning("Client canceled the 'process-files' request.");
        // Standard: Client Closed Request
        return Results.StatusCode(499);
    }

    return operationCompleted
        ? Results.Ok("File processing completed successfully!")
        : Results.StatusCode(500);

});

app.MapGet("/aggregate-data", async (CancellationToken ct) => {
    logger.LogInformation("Started 'aggregate-data' endpoint.");

    try
    {
        await AggregateDataAsync(ct);

        logger.LogInformation("'aggregate-data' request completed successfully.");
        return Results.Ok("Data aggregation completed successfully!");
    }
    catch (OperationCanceledException)
    {
        logger.LogWarning("Client canceled the 'aggregate-data' request.");
        return Results.StatusCode(499);
    }
    catch (Exception ex)
    {
        logger.LogError(ex, "An error occurred during 'aggregate-data' processing.");
        return Results.StatusCode(500);
    }
});

async Task AggregateDataAsync(CancellationToken ct)
{
    logger.LogInformation("Starting data aggregation task.");

    for (int i = 0; i < 5; i++)
    {
        ct.ThrowIfCancellationRequested();

        logger.LogInformation($"Aggregating data batch {i + 1}/5...");
        await Task.Delay(1000, ct);
    }

    logger.LogInformation("Data aggregation task completed successfully.");
}

async Task<bool> ProcessFilesAsync(CancellationToken ct)
{
    logger.LogInformation("Starting file processing task.");

    for (int i = 0; i < 5; i++)
    {
        if(ct.IsCancellationRequested)
        {
            logger.LogWarning("File processing task was canceled.");
            return false;
        }

        logger.LogInformation($"Processing file batch {i + 1}/5...");
        await Task.Delay(1000);
    }

    logger.LogInformation("File processing task completed successfully.");
    return true;
}

app.Run();
Step 3: Run and Test the API
Start the application using the following command in your terminal:
dotnet run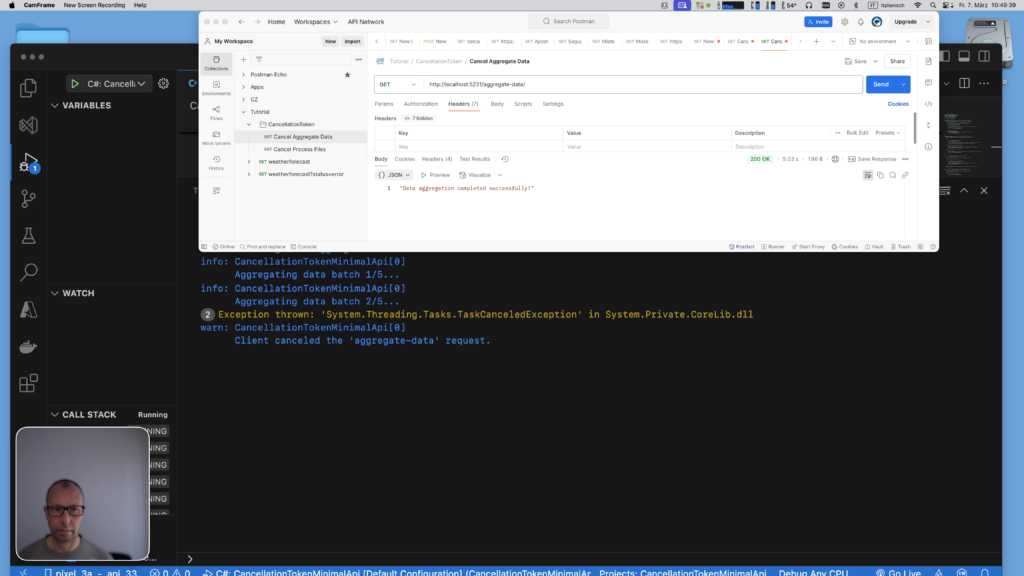
Access the Endpoints
Use a browser, Postman, or curl to access the following endpoints:
/process-files: Simulates a long-running file processing operation that periodically checks for cancellation usingIsCancellationRequested./aggregate-data: Simulates a data aggregation operation that immediately throws anOperationCanceledExceptionwhen cancellation is requested.
Code Explanation
Here’s how each part of the code works:
- CancellationToken
- The
CancellationToken ctis automatically passed to each endpoint when it’s called via HTTP. - It monitors for cancellation (e.g., client disconnection) and allows your code to react appropriately.
- The
ProcessFilesAsync- This method uses
cancellationToken.IsCancellationRequestedto periodically check for cancellation during execution. - If a cancellation is requested, it logs the event and exits the loop gracefully without throwing exceptions.
- This method uses
AggregateDataAsync- This method uses
ThrowIfCancellationRequestedinside the loop. - The method immediately stops when cancellation is requested by throwing an
OperationCanceledException, which is caught in the endpoint.
- This method uses
- Status Codes:
- The endpoints return
200 OKon successful completion. - If cancellation occurs, the API returns
499 Client Closed Request. 500 Internal Server Erroris returned for any unexpected issues.
- The endpoints return
Testing Behavior
- Normal Execution
- When no cancellation occurs, both endpoints run their respective tasks to completion and return
200 OK.
- When no cancellation occurs, both endpoints run their respective tasks to completion and return
- Client Cancellation
- If the client cancels the request (e.g., interrupts
curlor stops the Postman request), the following happens:/process-files: Stops processing and exits gracefully without throwing an exception, returning499./aggregate-data: Throws anOperationCanceledException, which is caught and results in a499response.
- If the client cancels the request (e.g., interrupts
Differences Between IsCancellationRequested and ThrowIfCancellationRequested
IsCancellationRequested is a property of the CancellationToken that allows you to manually check if a cancellation request has been made. It doesn’t throw an exception automatically you need to handle the logic explicitly when the property is true.
ThrowIfCancellationRequested checks the same underlying CancellationToken but throws an OperationCanceledException immediately if cancellation is requested. This exception automatically interrupts the flow and allows you to short-circuit the operation.
Conclusion: The Importance of Using CancellationTokens in .NET
Handling long-running operations in your applications is a common challenge, and improper management of resources can lead to wasted computation, poor responsiveness, and even server instability. This is where CancellationTokens come in—they enable cooperative cancellation, allowing your application to efficiently stop unnecessary tasks when client requests are canceled.
In this article, we explored how to leverage .NET’s native support for CancellationToken to improve the responsiveness and performance of your APIs. By understanding the difference between manually checking cancellation with IsCancellationRequested and using ThrowIfCancellationRequested, you now have the tools to gracefully handle cancellation in different scenarios.
The native support for CancellationToken in .NET makes it incredibly simple and straightforward to implement cancellation handling. It integrates seamlessly with modern development practices like asynchronous programming and Minimal APIs, ensuring your applications remain scalable and performant.
Why You Should Always Implement It
- Optimize Resources: Stop tasks that are no longer needed, freeing up CPU and memory.
- Improve Responsiveness: Prevent your API from hanging on abandoned requests.
- Easy to Use: The .NET SDK provides everything you need to handle cancellations effectively, with minimal code changes and a cohesive developer experience.
By including proper cancellation handling in your projects, you will build applications that are not only more robust but also deliver a better experience for your users. Remember: responsiveness is not optional it’s essential.
If you think your friends or network would find this article useful, please consider sharing it with them. Your support is greatly appreciated.
Thanks for reading!
🚀 Discover CodeSwissKnife, your all-in-one, offline toolkit for developers!
Click to explore CodeSwissKnife 👉